
はじめに #
pyvmomiにはオブジェクト(ESXi, VM等)の情報取得に特化した、propertyCollectorという機能があります。
これを使用すると、大量のオブジェクトにわたる特定のプロパティの変更を追跡したり、特定の条件に基づいてオブジェクトのプロパティを一括で取得したりすることができます。
大規模なvSphere環境ではpropertyCollectorを使うことで効率よく情報が収集できる様になります。
1. とりあえず使ってみる #
propertyCollectorの実用例を見ないと、何ができるのか分からないのでまずはpyvmomi-community-sampleにあるcodeを使ってみましょう。
A place for community contributed samples for the pyVmomi library.
collect_propertiesが該当の関数になるので、これを自分のコードにコピーしておきましょう。
| 引数 | 意味 |
|---|---|
| si | ServiceInstanceのオブジェクト |
| view_ref | 第5回で説明したContainerViewのオブジェクト。検索対象を指定するために必要 |
| obj_type | 検索対象のオブジェクト。VMならvim.VirtualMachineなど |
| path_set | 取得したいパラメーター |
| include_mors | パラメーターのみの取得の場合はFalse 該当のオブジェクト自体も合わせて取得したい場合はTrue |
実際にVMの名前、uuid、cpu数、mem量を取得してみると以下の様になり、全VMの情報を取得したい場合は、1つ1つオブジェクトを取得してパラメータを集めるよりも手軽にパラメータを集めることができます。
import os

from pyVim import connect

def collect_properties(si, view_ref, obj_type, path_set=None,include_mors=False):
    """
    Collect properties for managed objects from a view ref

    Check the vSphere API documentation for example on retrieving
    object properties:

        - http://goo.gl/erbFDz

    Args:
        si          (ServiceInstance): ServiceInstance connection
        view_ref (pyVmomi.vim.view.*): Starting point of inventory navigation
        obj_type      (pyVmomi.vim.*): Type of managed object
        path_set               (list): List of properties to retrieve
        include_mors           (bool): If True include the managed objects
                                       refs in the result

    Returns:
        A list of properties for the managed objects

    # 長いので省略。詳細は以下
    https://github.com/vmware/pyvmomi-community-samples/blob/master/samples/tools/pchelper.py#L10C1-L11C44
    """

# 検索範囲はrootFolderから全部のVMに
cv = si.content.viewManager.CreateContainerView(
    container=si.content.rootFolder,
    type=[vim.VirtualMachine],
    recursive=True,
)

retrive_results = collect_properties(
    si=si,
    view_ref=cv,                 # 検索範囲をContainerViewで作成
    obj_type=vim.VirtualMachine, # 検索対象を指定する。
    path_set=[                   # 取得したいパラメーターを指定する。
        "name",
        "config.uuid",
        "config.hardware.numCPU",
        "config.hardware.memoryMB"
    ]
    include_mors=False,
)

for prop in retrive_results:
    print(
        n.obj.name,
        n.obj.config.uuid,
        n.obj.config.hardware.numCPU,
        n.obj.config.hardware.memoryMB
    )

# >>>v10-nesxi-03 420863db-7219-5a70-4f40-f66b33fdbe64 2 8192
#    v10-nesxi-01 4208c8e4-0e03-5a56-1051-e89956064725 2 8192
#    v0-k8s-01 4226ff8f-99b4-629c-ff4b-ba3d063ab681 4 8192
#    v0-k8s-02 42263d28-7461-c318-5761-9fc84a8eb7a6 4 8192
#    v0-vcsa-01 564d5eab-142b-29a5-c149-519a115bd23e 2 14336
#    cloud-init-01 423d367e-a962-536e-39fe-939098e3af2e 2 4096
2. deprecated #
collect_propertiesの中身を見てみると、今回紹介するpropertyCollectorがちゃんと使われていることがわかります。
    collector = si.content.propertyCollector

    # Retrieve properties
    props = collector.RetrieveContents([filter_spec])
しかしpropertyCollector.RetrieveContents()ですが、実はMOBには表示されない隠しMethodになっています。。。
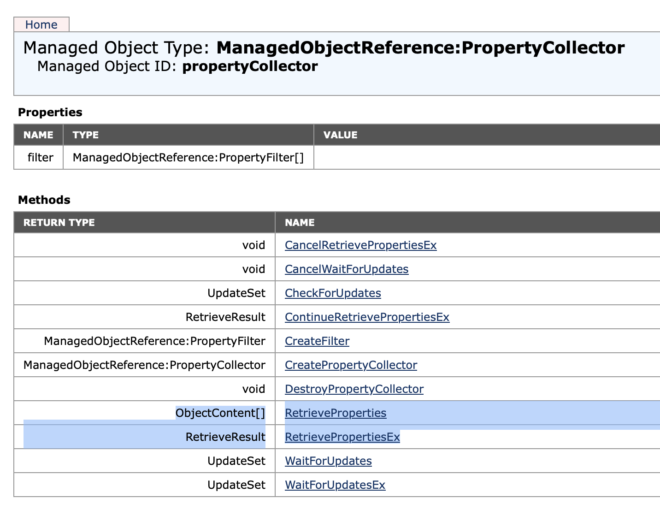
そこで公式のAPIdocsを確認してみると、どうやら今はRetrieveContentsはRetrievePropertiesという名称になっているようです。
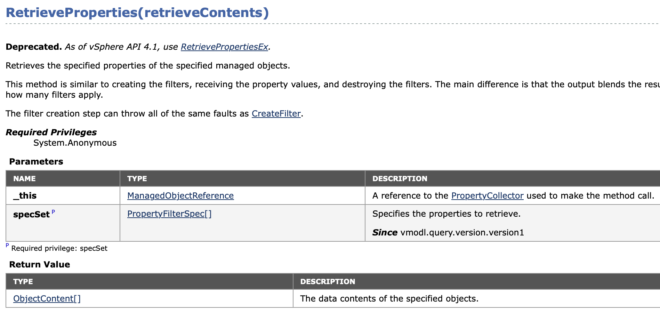
そしてより注目したいのは、以下の文でRetrievePropertiesはそもそもDeprecatedになっており、RetrievePropertiesExを代わりに使うように記載しています。
Deprecated. As of vSphere API 4.1, use RetrievePropertiesEx.
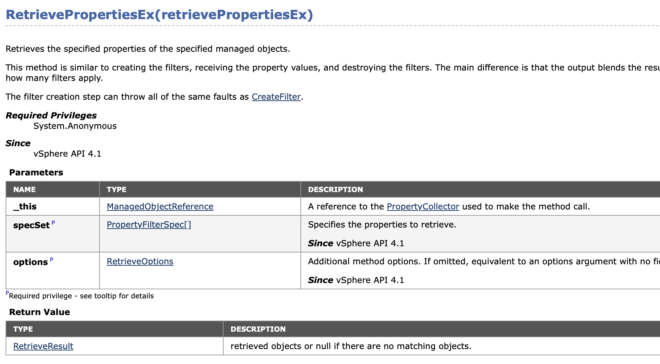
3. RetrievePropertiesEx #
しょうがないのでRetrievePropertiesExをみていきます。
主な変更として、RetrieveOptionsの引数が必要になっている + RetrieveResultという返り値になっています。
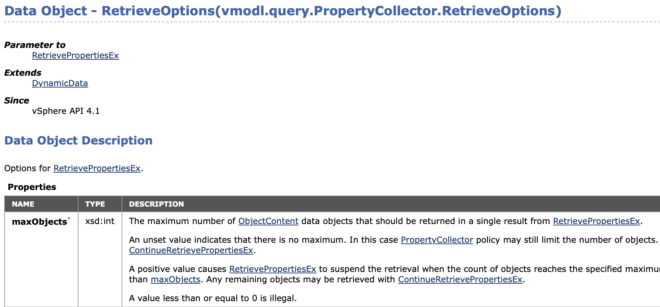
RetrieveOptions #
RetrieveOptionsはRetrievePropertiesExで一度に取得するオブジェクトの最大数を指定することができます。
An unset value indicates that there is no maximum. In this case PropertyCollector policy may still limit the number of objects.
とあるのでvmodl.query.PropertyCollector.RetrieveOptions()でも無制限に取得できるわけではなさそうです。
RetrieveResult #
RetrieveOptionsで一度に取得する最大数を指定できるので、取得しきれなかった場合のためにページングの機能が必要になります。それを満たしたのがRetrieveResultになります。
RetrieveOptions(maxObjects=3)を指定した時の挙動をみてみると、ちゃんと3オブジェクトごとに分けて取得できています。
def collect_properties(si, view_ref, obj_type, path_set=None,include_mors=False):
    # 省略

    # props = collector.RetrieveContents([filter_spec]) deprecatedなので代わりにExを使う
    props = collector.RetrievePropertiesEx([filter_spec], vmodl.query.PropertyCollector.RetrieveOptions(maxObjects=3))

    # 省略

retrive_results = collect_properties(
    si=si,
    view_ref=cv,                 # 検索範囲をContainerViewで作成
    obj_type=vim.VirtualMachine, # 検索対象を指定する。
    path_set=[                   # 取得したいパラメーターを指定する。
        "name",
        "config.uuid",
        "config.hardware.numCPU",
        "config.hardware.memoryMB"
    ]
    include_mors=False,
)

# RetrieveResultにtokenが指定される。結果はRetrieveResult.objectsに格納されている。
print(res)
# >>>(vmodl.query.PropertyCollector.RetrieveResult) {
#    dynamicType = <unset>,
#    dynamicProperty = (vmodl.DynamicProperty) [],
#    token = '1',
#    objects = (vmodl.query.PropertyCollector.ObjectContent) [

# ページングの処理を実施
while True:
    for n in res.objects: # 結果はobjectsに格納されているので取り出す。
        print(
            n.obj.name,
            n.obj.config.uuid,
            n.obj.config.hardware.numCPU,
            n.obj.config.hardware.memoryMB
        )

    # tokenがある場合は、`ContinueRetrievePropertiesEx(token=res.token)`を使って続きが取得できる
    if res.token is not None:
        res = si.content.propertyCollector.ContinueRetrievePropertiesEx(token=res.token)
        print(f"---{res.token}---")

    # tokenがない = 情報を取得しきれたので終了
    else:
        break


# >>>v10-nesxi-03 420863db-7219-5a70-4f40-f66b33fdbe64 2 8192
#    v10-nesxi-01 4208c8e4-0e03-5a56-1051-e89956064725 2 8192
#    v0-k8s-01 4226ff8f-99b4-629c-ff4b-ba3d063ab681 4 8192
#    ---1---
#    v0-k8s-02 42263d28-7461-c318-5761-9fc84a8eb7a6 4 8192
#    v0-vcsa-01 564d5eab-142b-29a5-c149-519a115bd23e 2 14336
#    cloud-init-01 423d367e-a962-536e-39fe-939098e3af2e 2 4096
#    ### 省略 ###
#    ---4---
#    v10-nesxi-02 42085f77-f8b0-26e9-52f0-1d83b6261268 2 8192
#    v0-dev-01 564d90b3-ca16-95e3-3b65-a2846490babe 4 8192
#    vCLS-3e577c54-d744-4f0b-b271-bf32d187e617 42086441-e769-41f8-0d21-5e55104525de 1 128
#    ---None---
#    vCLS-2057e11a-37e8-4e98-be14-ce4aba08bfda 4208986c-3e4f-fdda-0710-ff314a00bee4 1 128
#    vCLS-4b46a5bb-cea2-4658-982d-6700e742cd6d 42084c10-d845-9174-2aa5-bbfbc7f97cf5 1 128
RetrievePropertiesExは常にtokenをcheckしないと情報取得漏れが起きそうなので注意しましょう。
おわりに #
vSphereの運用をしていると、「あのVMっていつ作成されたのか?」、「VMのリソース使用量の推移」、「あの時はどのESXiで稼働していたのか?」等々、VMの情報を遡ってみたいことがあります。
その時にはpropertyCollectorを使う + 定期実行することで、VMの情報を常に控えておくことができるので非常におすすめです。
ただ結構使うのが面倒なので、第5回で解説したContainerViewとforループで済ませることも多いですが。。。